

























Gentleman Jon — In this instalment I’ve slightly tweaked the player performance data to make the amount of healing a player receives more easily comparable, covered some matches, and investigated whether it’s really possible to measure what a player should be doing relative to their healing.
TLR vs Decerto
Decerto entered this game having had some tough results and found themselves facing a battle for survival in the division. By contrast TLR were coming fresh off their wins over fellow playoff contenders Reverto and were looking to consolidate a position as best of the rest behind Epsilon.
Week 5 introduced Viaduct, the Koth format encouraging constant fighting, suicide waves and aggression against the background of the ever ticking clock.

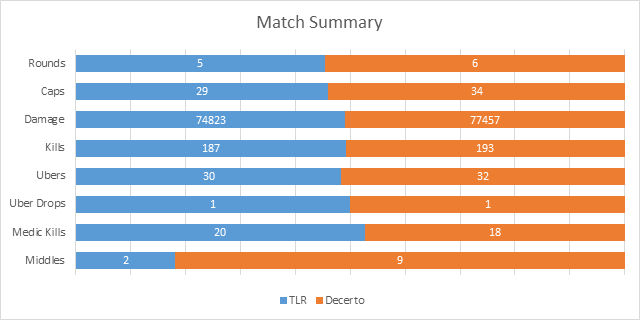
As you might expect in a match that split the maps the stats are very even. The damage totals aren’t massively inflated so perhaps Viaduct strategies are becoming a little more refined. Decerto have a massive advantage in middles which once again goes to prove that it doesn’t really mean much for the final result.

Kiler takes his customary place as the player with top KAD once again wrecking the opposing team. Sheepy sees a return to form after a few disappointing matches and Hildreth had monstrous damage backed up by big heals, and you can see that comparatively Decerto got better healing throughout.
Judging by this chart you’d have expected Decerto to have taken the match as so many TLR players have inferior KAD, but there’s clearly something about the Koth format that subverts this normal pattern.
Nadir also notably got the highest damage of any soldier, but still ended up the lowest on KAD.


Rake and Kiler both formed several good fragging partnerships with their teammates and each other. Both profited from Hys’s damage with Rake cleaning up after Kalho while Kiler worked with Nadir. As you’d expect from his dominant KAD Kiler was strong with everyone on his team. Hys and Kalho also linked up to good effect. Evilmoon had difficulty picking up many assists with anyone, unexpectedly getting the most with Kiler.
For Decerto rather than the Furbo and Sheepy axis that has dominated their team assisting in recent weeks, Shifty formed a good rapport with Sheepy and they were the top fragging pair. Bulle stuck to Hildreth for the most assists while healing, dropping back to his pocket soldier and scout respectively. Apart from the medic, there’s a lot of generally spread out assisting throughout the team with really only Zoob and Shifty staying apart.


As is usually the case with the roamer Decerto players were queuing up to frag Nadir with Furbo, Sheepy and Zoob all counting him as their top target, but it wasn’t all one way traffic with Hildreth and Shifty losing out to him head to head. Evilmoon and Kiler were both taken down most often by Hildreth. The kills were spread out amongst the Decerto players fairly evenly with no one the runaway leader.
Kiler on the other hand was the clear fragging leader for TLR with Hys as the player closest to bridging the gap, although Hys had more kills against Bulle and Sheepy. Kiler only lost out to Sheepy in his head to heads, and Hys narrowly beat Hildreth as well as scoring the most medic frags on his team.
Shifty fed TLR’s kill totals similarly to Nadir, but Sheepy had a similar record to Kiler only losing out to Hys in the head to head. There are many parallels in the fragging stats as well as the game being very even.
TLR are aiming for the best of the rest slot after Epsilon and this result will have been a missed opportunity for them. Decerto on the other hand have gained two valuable points from the golden cap win in their battle to survive in the division.
Willy Wonkas Chocolate Factory vs Evokate
Evokate and WWCF have both had unpredictable form, so this was bound to be a difficult game to predict particularly with the wild card of the Koth format thrown in.

As it turned out the maps were split. As with the Decerto/TLR match above the side winning the 5cp map has the higher point capture total and squeezes ahead in some other stats.

Also as we saw in the previous match inferiority in the key KAD stat doesn’t seem to matter on Viaduct. Exon came to life on Viaduct in much the same way that Hidreth did (without threatening the epic 450 dpm target), is it possible there’s such a thing as the Koth specialist demo? Kaidus didn’t gain a damage benefit from the format.
KnOxXx was his team’s spearhead as usual and Smzii was head and shoulders above anyone on Evokate cleaning up. In fact Smzii was the only scout with the usual profile of lower relative damage than KAD. It doesn’t seem that any scout was causing particularly high damage, more that there’s a massive kills/assist black hole at the top of the tree and everyone else is on the other side of it.


Smzi is the Lucky Pierre in a prodigious KnOxXx/Smzi/ Zebbosai three-way for Wonka, with 2nuts and KnOxXx have a little to themselves on the side. Kaidus cuts a bit of an isolated figure here, linking up most with Salt out of the fragging classes which is unusual for a demoman.
For Evokate there’s no such statistical reward for taking Viaduct, but the combo of Tek and k3 stood out while the scout duo of Flippy and Plapla were a thorn in the Chocolate Factory’s side. Despite his map leading damage on Viaduct Exon didn’t pick up big assist stats, Flippy being the main opportunist on his damage.


Smzi’s KAD is significantly boosted by T-Mac providing a steady diet of roamer deaths which KnOxXx also benefitted from, T-Mac rarely picking up the frags of 2nuts, Smzi or KnOxXx in return. Salt’s generosity wasn’t on the same level.
Zebbosai had a solid kill count but got the worst of it against Flippy and T-Mac individually. Flippy only lost out narrowly to KnOxXx in his head to heads, although Plapla ended up getting the worst of it from every damage class on WWCF.
Importantly for Evokate their pocket Tek actually came out on top against KnOxXx head to head which must have been a factor in the success they had although he suffered very badly against Smzi.
WWCF once again proved susceptible to an unexpected dropped map, but still maintain their position as a strong playoff contender. Evokate managed to play the joker once again, no doubt aided by the change of style required from Koth. If they could improve their performances against weaker teams they would be a force, but at the same time no one can take them lightly (except Epsilon who take everything lightly) as they can seemingly overturn the odds against anybody.
TSE vs TLR
This delayed match had become an altogether juicier affair than might have been expected with gamesmanship coming to the fore and TSE collecting a warning for flaming after the original cancellation. Both team also looked very evenly matched so were fighting for similar league positions when the final reckoning is made.

The advantages swing back and forth in the different categories, TLR edging caps and ubers but TSE edging kills and damage which reflects the incredibly close and tense nature of the game.

War gets top damage (fed by an enormous total on Gullywash) and KAD for the second TSE game in succession although it’s not quite as dominant a performance as previously. The biggest surprise is that Kiler was really kept in check where he’d been the cornerstone of TLR’s games, although the immediate post match analysis on TSE’s streams was that he had still been a thorn in their side.
Both TSE scouts put in powerful performances, fl1p in particular cleaning up mercilessly. However Kalho was the dominant soldier, keeping close to War on KAD and provide a vital island of statistical strength for his team. KLar wasn’t far behind but couldn’t match him, looking a bit more pocket-like than usual. Hys’s damage was within the normal demo range and he got better KAD than both his scouts.
Looking at the heal levels it appears that TSE had more heals per minute in general, but Evilmoon got more assists than Byte, which would suggest that more of TSE’s heals were in situations like recovering after a fight, contesting a choke without fragging, building uber, etc.


The big partnership for TSE and in the entire match was Droso and fl1p who are starting to develop consistency as a pair. Byte assists were spread widely across his team, obviously focusing on War but unexpectedly Forsak3n fought with him more than KLar. Evilmoon by contrast was strongly linked to Kalho and Hys but practically no one else.
War worked well with all his team mates but saw his roamer the least, both KLar and War worked mostly with the two scouts, with fl1p slightly favouring KLar.
For TLR Kalho was the center of the fragging, getting double figures assists with all his team mates except Hys. Nadir and Rake formed a clear flank partnership while Kiler just tried to spread the mayhem around. Hys had a very strong relationship with Evilmoon which probably hides any clear biases in his team support.


Hys lost out to War in their head to head but had positive KD against every other TSE player, and it’s similar with Kalho except he’s also matched by KLar. Kiler was the TLR player who got the better of War preventing him getting the clean sweep and probably why War considered him a problem.
Byte was killed the most by Hys but Kiler and Nadir also got a lot of kills against him indicating an apparent weakness protecting the medic against the flank, although Byte is more willing to give up his life than most other medics. Evilmoon was most often killed by Forsak3n but other than that it was only a handful of frags against him by other players.
Because the game was so close there are no totally dominant performances, and very few patterns emerge. TSE had the edge statistically but it would have been an injustice if TLR hadn’t got something out of this game, but if it had been golden cap points there could be little complaint. TLR certainly seemed to make the most of their openings and maximised their chances whereas TSE were perhaps a little more wasteful.
Epsilon vs Reverto
This week 6 clash saw Epsilon pushed pretty hard on the 5cp component. Taking over as main caller Ipz may be taking credit for this, although it’s possible Epsilon’s lack of practice is starting to show. Stark moved to scout from pocket soldier.

Reverto managed to gain a few advantages, squeezing out slightly more ubers and many more middles and managing as many point captures throughout the match. The equality in caps is partly down to the nature of Koth maps where a team only ever has one cap more than the opponent when they win a round, and on 5cp contested rounds keep the total close and a couple of quick rolls make it look more equal that it was.

As established in the i49 map review scouts can flourish on this map and Stefan leads the cleanup here and puts out more damage than every soldier other than Mike. Numlocked leads on damage but Huhy isn’t that far behind. Gear out damages and out kills both Reverto soldiers. Stark’s return to scout was relatively successful picking up the best cleanup on his team and putting out near soldier level damage.
Other than that it’s as you would imagine with Epsilon suppressing the Reverto soldiers and denying the demo his support and cleanup.


Bash and Stefan formed a strong fragging pair but were equalled by Ipz and Huhy. However only Rising and Stark were able to form a further significant partnership for Reverto whereas Epsilon are full of double figure pairings.
Stefan had double figure assists across his entire team’s fragging classes, whereas Bash showed a clear preference for the combo. Gear worked mostly alone apart from Stefan but met up with Mike a bit more than anyone else.
For Reverto Stark also supported Huhy and e-thug but Bar found himself short of assists with anyone really which is unusual, he often seems to be healing into combat but presumably was overexposed beyond his team’s ability to protect him in this match or possibly used as tactical bait.


Mike manages to collect more kills in every head to head, with Stefan falling behind only to Stark who managed the same feat in reverse.
Huhy actually got the better of Numlocked in their direct battle, but it looks like Mike cleaned him up after these successes with the Epsilon demo focusing more on killing off Ipz when the combos met.
Other than Mike’s performance Reverto mixed it up pretty well, but that’s the Epsilon advantage, whoever you get on top of there’s always a world class player popping up to beat you down.
Ultimately Reverto can’t have expected points from this match but they got surprisingly close on Snakewater to taking a point at least. Epsilon may have had a bit of a wake-up call, but whether they feel they require some more intensive practice remains to be seen. Dare we say there is the scent of the reigning champion’s blood in the water?
Reverto vs CWC
Reverto had the chance to immediately recover from their Epsilon match while CauseWeCan were looking for another chance to gain an advantage in the battle for the basement with Decerto. Members of Cause may wish to avert their gaze at this point.

It’s superiority for Reverto across the board, CWC got a few rounds but never threatened. With Ipz now calling the shots Reverto may become the best flat track bully in Prem as Infused were in season 15.

You don’t often see a division of the player performances like this but Reverto managed six out of the top six on KAD. That’s an impressive level of DM and coordination throughout the team.
Stark and e-thug filled their boots piling on the kills and assists, although Beavern was the top damaging scout. Brego almost kept pace with Huhy in a losing effort but the soldier superiority was very strong for Reverto with even the roamer clearly out-damaging the Snyp and Slate pairing.
Ipz may have had Bar’s medigun surgically inserted into his body.


Walker and Brego were the one bright spot for CWC although Slate managed to pick up moderate partnerships with Beavern and Snyp.
Reverto in contrast slathered themselves in blood of their enemies, Stark and e-thug forming the top partnership while Ipz and Bar formed the centre of their meat grinder. Both scouts worked well around the demo while e-thug also had double figure assists with the soldiers.


Bright spots are few and far between for CWC, even the traditionally suicidal roamer wasn’t feeding their stats. Beavern did manage to keep e-thug and Ipz from having positives across the board but was himself beaten head to head by Huhy, just as Brego stopped Stark achieving the same feat.
Bar was obviously enjoying himself getting 4 individual kills.
Reverto’s season had been threatening to descend into mediocrity with the scout problems but integrating Ipz into the front line has taken them in a new direction. Whether this result heralds a new merciless style or whether the clash of teams was just particularly favourable to Reverto time will tell. They have one last match to play and it’s a vital one against fellow playoff contenders Willy Wonka’s Chocolate Factory.
CauseWeCan are entering the final stages of a deadly struggle with Decerto to avoid the wooden spoon. Their week 7 clash could be the stuff of legends, although Decerto will fancy their chances of picking something up from the wildly unpredictable Evokate.
TSE vs Evokate
TSE had some connectivity issues in this one but no one was blaming it on nefarious activities. It did result in the remarkable sight of TSE winning a 5 man push into Snakewater last and later on holding their own defending with just 4. Ultimately it didn’t have a serious effect on the outcome. Evokate revisiting their horror map lost against CauseWeCan in about 5 minutes didn’t improve a huge amount this time around.

As you’d expect from the result TSE came out comfortably ahead although Byte dropped uber, a blemish on his record he won’t be pleased with. The stats don’t show some of the cunning Evokate tactics that served to confuse things on Granary but they deserve a mention here.

Droso and fl1p once again top the fragging charts for TSE and War put out massive damage that Exon didn’t even get close to. Only Flippy disrupts the TSE statistical victory parade, his headshot sprees stopping several pushes dead in their tracks.
KLar also finished well ahead of his Evokate counterpart Tek, his statistical footprint continues to look a bit more like a pocket soldier than in his early TSE games.


War and Byte dominate the kills and assists for TSE no doubt due to several rounds of Kritz. Droso picked up meaningful partnerships with fl1p and War, and once again Byte is getting more assists with his scouts than his soldiers. KLar spent a lot of time supporting the traditional flank players who also worked well together.
Evokate’s top pair were k3 and Exon who had some Kirtz success themselves, Exon also getting good support from Tek. Flippy predictably had good relationships with Plapla and Tek. The flank pair of Plapla and T-Mac didn’t get much success together, the class pairing of soldiers and scouts were more productive.


T-Mac fed two of the top three fragging head to heads for TSE with Droso and KLar the beneficiaries, although he did finish off War the most often just claiming that accolade ahead of Flippy’s headshots. War also dominated Tek.
Things between Exon and War were equal but Exon suffered at the hands of KLar. Flippy had mixed fortunes beating Forsak3n (the biggest fragging head to head plus for Evokate), KLar and fl1p in his head to heads but losing out badly to Droso and despite having homing bullets for War’s head he came out behind in that battle as well. Flippy was the Evokate player who stopped KLar getting a clear fragging superiority over every Evokate player.
This one went to form and leaves TSE all but guaranteed a playoff spot. With this loss Evokate secured their traditional lower mid finishing spot although one of Decerto or CauseWeCan can still theoretically threaten them.
TSE vs Epsilon
Before this match Epsilon, apparently shaken by losing some rounds to Reverto and going through the ignominy of holding on to a result, decided to warm up, with terrifying results.

Not a stat out of place, and Raymon only died twice making it through all of Viaduct unscathed. Going by caps to rounds averages TSE should have had a few rounds at least and had opportunities to push on Process but it just didn’t happen.

Raymon’s KAD stat is what happens when you get a freakishly emphatic roll. TSE were well and truly Miked in this game who set what must be close to a practical maximum for soldier damage ruling out some kind of Kritz fest.
Numlocked did what was necessary to ensure his damage superiority over War who still put out a creditable amount and even managed a respectable KAD. It was abject horror for the rest of his team though posting KAD that looks more like KD. It must all have amounted to a particularly miserable outing for the medic Byte who couldn’t fight back.
Forsak3n managed to out damage his pocket presumably by dodging the central juggernaut and fleeing to the flank.


The source of Raymon’s ridiculous KAD stat is clear, doubling the next best partnership on his team with Mike. Bash and Numlocked supplement the rest of it, while Stefan is almost entirely ignored by his medic in combat and Gear was completely shunned.
The rest of Epsilons’ assist pattern if pretty evenly spread although the scouts didn’t do cleanup for Numlocked all that often and the two soldiers don’t appear to have worked together that much, although Raymon’s unkillable presence may have hidden some of that.
For TSE the main combo of War and Byte are the only real bright spot. The recently potent scout axis of fl1p and droso achieved next to nothing in this match, although fl1p managed to hook up with KLar and War a little.
The rest of the assists for TSE would make you assume the players hardly saw eachother if they were on Epsilon the gap in performance is so huge.


The body parts that made up the trail of destruction left by Mike’s rocket launcher were largely KLar, Forsak3n and droso. Bash was the main tormenter of War and also fed his stats on the TSE soldiers. Stefan seems to have spent most of the game reading a book and smoking a pipe, occasionally looking up to left click. Oddly he ended up with a negative head to head against everyone except Byte and Forsak3n.
War is the TSE player who emerges with some credit getting positives against everyone expect Bash. Forsak3n gets the dubious honour of being the only TSE player to kill Raymon.
TSE will probably have been shocked with how badly they were overrun and some soul searching about their own play may well be the result. Epsilon probably didn’t expect it to be this easy and although they were clear favourites (as they are in every match) the scope of their victory surely doesn’t represent the true comparative talents of the teams. The consolation for TSE is that very little was riding on it.
Willy Wonkas Chocolate Factory vs Reverto
Reverto’s last match of the season was also a key one for them. Having fallen behind TLR and TSE in the playoff race their position was under direct threat from Wonkas who they faced over Granary and Snakewater.

As you’d expect from something of a nail biter it ended up close, but WWCF developed a clear but narrow advantage in death match stats and a very clear advantage in medic kills by the end to justify their points victory.

KnOxXx, Smzi and Kaidus put in the winning performances although Salt and Zebbosai had a much harder time on the flank. Kaidus had clear superiority over Huhy and Ipz was unable to match KnOxXx. Stark out damaged Smzi, but didn’t produce quite the same cleanup.
E-thug out fragged Zebbo by a hair but the big differences were really in the pocket and the demo.


Stark and e-thug formed the heartbeat of the Reverto team, which considering they haven’t been scouting together for long is impressive. Huhy had productive links with both his scouts and was also his medic’s main fragging partner just ahead of Ipz. The pocket soldier had moderate partnerships with his demo and e-thug but wasn’t the focus of his team.
By contrast the KnOxXx and 2nuts relationship was the centre point of the team along with KnOxXx and Smzi. Kaidus had an excellent KAD but didn’t have an individually prolific relationship, everybody benefitting from his damage.


Stark’s stats were fed heavily by Salt and Zebbosai, although he had relatively even battles with Smzi and KnOxXx. As his stats indicated Ipz had a hard time head to head with everybody only marginally getting the best of Salt and Kaidus but badly losing out to the other fragging classes.
It was also a mixed bag for Huhy, while Kaidus had plusses against everyone but Ipz. KnOxXx was equal with Stark but had positives on everyone else. This was probably the performance that edged the total points in WWCF’s favour.
Reverto were left biting their nails hoping that WWCF will fall flat on their faces in their remaining games while TLR and TSE could breathe a small sigh of relief that their top 4 spots are guaranteed. It seems the roster disruption for Reverto has eventually been too much for them to overcome, and with some more changes guaranteed before next season this will ultimately be a disappointing end should they lose out.
WWCF continue to confuse and frustrate both their fans and themselves as their roster promises much but doesn’t seem to gel. They could be dark horses for the playoffs though if things come together at the right time.
Cause We Can vs Decerto
This was probably the decisive battle for the basement and it was a very, very close struggle ending in a golden cap on Granary and a 3-2 on Snakewater, with the extra league point going in the favour of Decerto. This game was also notable for the presence of F2’s medic stats plugin.

As you’d expect there’s almost nothing in it. Decerto’s edge in damage and kills is negligible, and CWC evidently focused the medic as a top target forcing no less than 4 drops out of Bulle. The caps and rounds stats are exactly equal.

The only glaring disparity between the teams in this game is where wltrs ends up compared to his scout counterparts. In a game as close as this that could have been the difference. The Decerto scouts got a lot more attention from the medic than those on CWC, although the soldiers got a bit less.
I’m in two minds about the medic stats, on the one hand I think they are possibly more interesting, but at the same time it starts to render the season 16 dataset a bit meaningless with regards to healing. It certainly show how much overhealing is hidden in the normal stats.


Bulle and Hildreth were the strongest pairing for Decerto, but Sheepy is the player that holds them together picking up double figure assists with everyone but Zoob.
Beavern is CWC’s sheepy, putting up some massive assist numbers. Apart from Brego and Walker he was involved in all the best fragging partnerships for his team. Away from Beavern it all looks a bit anaemic and coordination appears to be lacking.
The main contrast between them is the soldier play, where Zoob and Shifty got solid numbers with their scouts and each other, the CWC pair lag behind.


Beavern nearly completes the clean sweep only losing out to Shifty by a couple of frags. However for CWC wltrs and slate struggled losing out in their individual battles more often than not and Snyp’s results were a mixed bag.
Shifty was very effective cleaning up both scouts while Hildreth and Brego had an almost even battle. Brego was the other CWC bright spot getting positives against both scouts and the roamer.
CWC just didn’t have enough firepower and although Beavern almost carried it wasn’t quite enough. There’s still a theoretical chance that CWC might avoid the wooden spoon but it’s unlikely they’ll get anything out of TLR in their last match. Decerto have a final match up Evokate so will probably fancy their chances of stretching the gap.
Inside the TF2 Laboratory – Unravelling the mysteries of the Medic
The Season 16 intermediate report raised some questions about the player healing and medic stats, what they show and whether they’re of any use. I must admit to adding them without a great deal of thought just to include something for Medics, but it was obvious that they didn’t really tell a great deal about the medics themselves, more about the teams they played in.
So in an attempt to find a better way to represent what the medics are doing and what it means for the teams and players they heal I’ve done some analysis. There are some obvious problems with the stats available:
The logs don’t show overheal which as F2’s plugin shows is a massive amount of healing (although unless it makes a distinction between healing and overhealing it’s also limited).
Any player with responsibility for helping the medic build will receive a significant amount of extra healing that has no clear statistical link to other metrics, particularly with no self-damage in the logs
Rollout heals are another niche use of healing that doesn’t have a directly measurable impact on other parts of the game
In addition to this the playing styles differ heavily from team to team, one team’s pocket soldier may have the heal beam both in and out of combat, another team may almost have two roamers with one subsisting on health pickups and one just getting the minimum from the medic while the traditional Euro demo gets the most attention, and everything in between.
Due to the limits of the logs the kinds of heals we see are recovery heals for damaged players but not preparatory heals for pushing. This will make them mostly rollout heals, during combat, recovery after fighting and building uber. This will hide a lot of the tactical intention from the heal stats, so it’s not possible to say with any authority what a certain player would be expected to achieve from their healing received.
Cutting to the chase….
To find significance in the heal stats there has to be an expectation of player’s performance associated with them, which means the ability to predict given the healing amount what that performance should be. To this end I looked for a certain type of relationship between heals and any other player activity in the game to try to identify a pattern that showed how a player ‘should’ behave with differing heal amounts.
I could waste thousands of words looking at scatter graphs but I can’t see anyone staying awake through that, so the fundamental findings of analysis are these:
Using a simple ratio of heals to something like damage is a blunt tool to represent what a player is doing with their healing received, it doesn’t produce meaningful results. All the problems identified below are made far worse by using a simple ratio.
Damage is a poor method by which to tell how well a player should be doing with their heals, although it is sometimes better than other stats depending on the class and the situation
Scouts have almost no relationship through any common metric to heals, it’s virtually an irrelevancy to them. Widespread use of Boston Basher to build uber may be a contributing reason for this weak link
KAD is the best common metric that correlates with individual healing available for the heavy classes
Demos have a better correlation with healing than soldiers, which is down to soldiers having split roles in pocket and roamer, whereas the demo is always expected to be the damage output machine
There’s no exotic combination of the standard stats that improves the accuracy, combining them just introduces the irrelevance of one into the other.
This is what the result of the analysis looks like


The R2 value on the graph shows the reliability of the trend line, the possible values go from 0 (no correlation) to 1 (or -1, a perfect correlation). 0.4 isn’t brilliant but it’s indicative. Each line represents an equation which can be used as the basis for working out an expected performance from the players within an error range. Values outside or at the edges of this range could be considered good or bad performances.
In each graph a value above the trend line is a player underperforming their healing received and a player below it is over performing. However it’s actually bad news for the soldier stats if we dig a little deeper. What gives it the illusion of consistency in the case of soldiers is the relatively low scoring (and therefore low variance) of roamers who barely get any heals anyway. If you only look at players who got larger amount of heals the lack of a pattern is much worse.

This is a really weak correlation, and can’t be realistically be used as a basis to draw any conclusions about soldier performance from their healing received. The stricter you make the pocket definition, the worse it gets, and seeing as pocket/combo soldiers are the ones that receive the biggest variation in the quantities of heals this is particularly bad for the notion you can tell anything useful from it. Amongst this group damage per minute does become more significant as a stat affected by healing (0.3), but not enough to be meaningful.
Ultimately a more complete model of player performance is required and healing’s place in that fully determined before any progress can be made.
Medic Performance
As Byte pointed out a Medic is only as good as his team, unless he’s kept alive he can’t be expected to produce great healing numbers. If a stat exists that predicts healing based on another aspect of team play then that could be used to define an expected heal rate for a medic in a particular game. The best I’ve found came from an unexpected place.

A team’s capping rate is the best easily available predictor of medic healing. At 0.4 correlation it’s not brilliant again but could be of some use. Quality of DM, team play, organisation and success over the opponents seem to be summed up in this one value, and those things all feed into medic survivability and healing.
Using the opponents statistics to predict the medic’s performance were interesting but not more accurate than his own team’s, and I’ve currently not found a better stat or combination of stats to predict medic healing from.
Outliers and counter-intuitive results
Without going into excessive detail the final problems with these stats is that in certain situations they produce outlying results that make no sense and punish players in teams that are doing very well. Mike comes off very badly in some games because Epsilon protect their medic so well and he gets huge heal numbers. This isn’t a result of the analysis, it would be far worse taking the simple ratio approach, it’s the result of healing levels becoming inflated and less relevant when one team is completely outclassing another and the player being healed (Mike in this case) is never dying and always making it back to his medic.
It also goes in the other direction, Gear out performs most other soldiers regardless of their healing received so taking that healing into account he regularly looks like the best soldier in the world by a massive margin. Maybe he is the best, but surely not to the extent implied.
Ultimately I don’t feel there’s enough here to take on any kind of healing received performance expectation statistic. I may add something simple in the future as long as it’s not too obtrusive to satisfy the curious. If there’s widespread adoption of something like F2′s medic stats then this may change depending on what it shows.
Originally published on VanillaTV (vanillatf2.org) on 2013-11-09 by diemasher.
Recovered from the Internet Archive (archived copy) as part of tf2esports.com's preservation of VanillaTV's TF2 coverage. The original site is no longer online. All rights remain with the original author; reposted for historical reference.